H8 — Bluetooth Fuel Sensor Setup
This guide takes you from a new Bluetooth fuel sensor to live fuel levels on Traqcare. Follow the steps in order.
You will need:
- Your H8 GPS tracker, installed in the vehicle and online on Traqcare.
- The Bluetooth fuel sensor (model YSBLE-B).
- A smartphone with Bluetooth and Location (GPS) turned on.
- Your fuel tank capacity in litres.
- A login to track.traqcare.com.
The steps at a glance
| Step | What you do | Where |
|---|---|---|
| 1 | Check whether the sensor probe was cut | On the sensor |
| 2 | Install the sensor app | Phone |
| 3 | Connect the phone to the sensor | Sensor app |
| 4 | Calibrate the sensor | Sensor app |
| 5 | Install the sensor and check the reading | Sensor app |
| 6 | Link the sensor to the H8 | Traqcare or SMS |
| 7 | Turn on the fuel sensor in Traqcare | Traqcare |
| 8 | Fill in the fuel calibration form | Traqcare |
| 9 | Check the live fuel level | Traqcare |
Step 1 — Was the sensor probe cut?
The sensor probe (the long metal rod) is often cut so that it fits the depth of the tank. This decides which steps you need:
| Your situation | What to do |
|---|---|
| Probe NOT cut (original length) | The sensor is already calibrated at the factory (range 0–65535). Write down the MAC address from the sensor's label, then go straight to Step 6. |
| Probe cut to fit the tank | Cutting changes the sensor's "empty" and "full" points, so it must be calibrated again. Do Steps 2 to 9. |
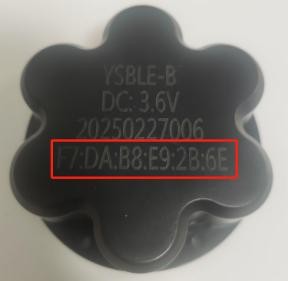
The MAC address is printed on the top of the sensor, for example F7:DA:B8:E9:2B:6E. You will need it in Step 3 and Step 6.
Step 2 — Install the sensor app
Android: scan this QR code with your phone's camera or browser, or open the link below on the phone, then install the app.
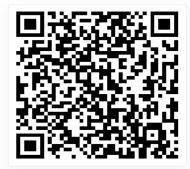
Download link: https://wldata.51js.net.cn/ys2024/ys1008.apk
Because the Android app is downloaded from a link and not from Google Play, your phone may ask you to allow installing apps from this source. Allow it for your browser, then tap the file again to install.
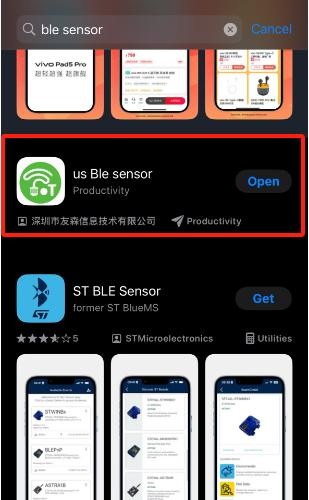
iPhone: open the App Store, search for us Ble Sensor (green icon) and install it.
Before you open the app, turn on Bluetooth and Location on your phone. The app uses Location to find nearby Bluetooth sensors and will not find the sensor without it. When the app asks for Bluetooth or Location permission, tap Allow.
Step 3 — Connect the phone to the sensor
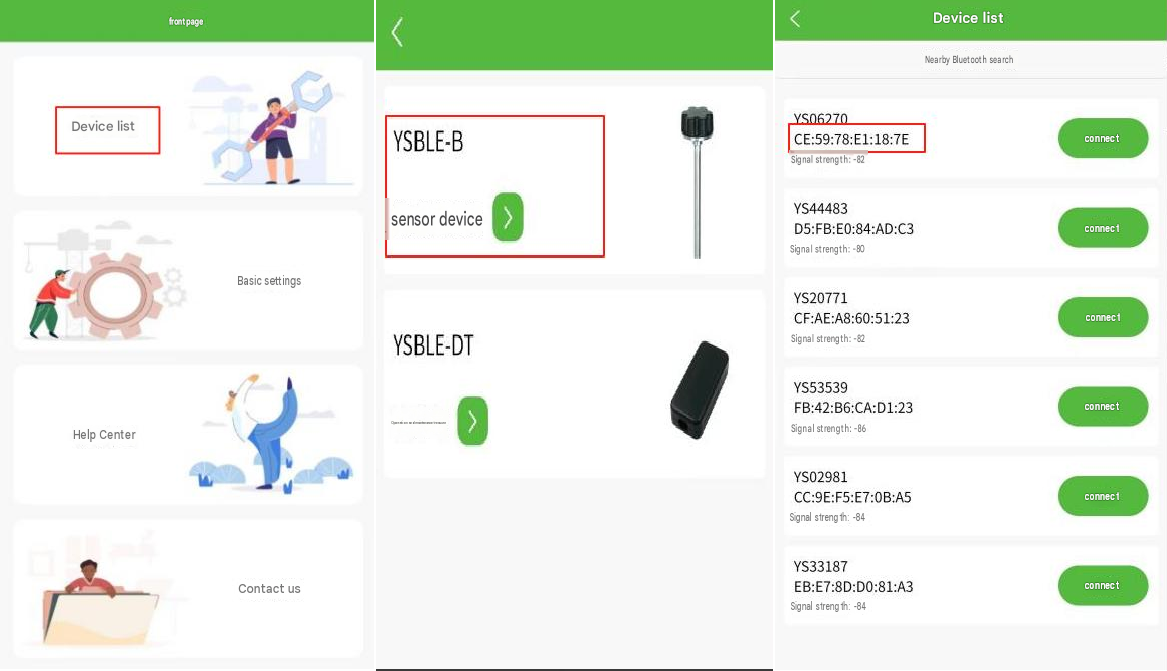
- Open the app and tap Device list.
- Tap YSBLE-B — sensor device.
- The app searches for nearby sensors. Find the one whose MAC address matches the label on your sensor, then tap connect.
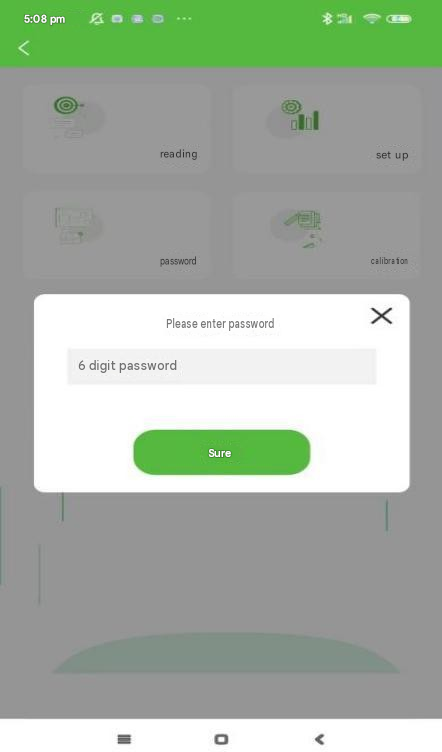
- The first time you connect, the app asks you to create a 6-digit password (numbers only). This password protects the sensor's settings.
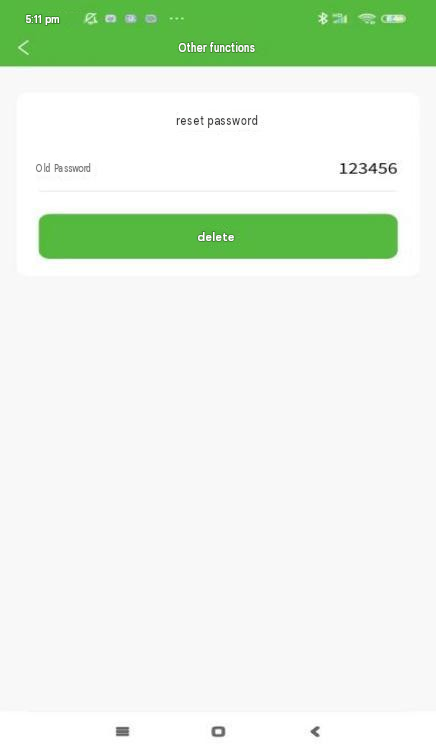
You will need this password every time you connect to the sensor. To change or remove it later, open the password menu and enter the old password.
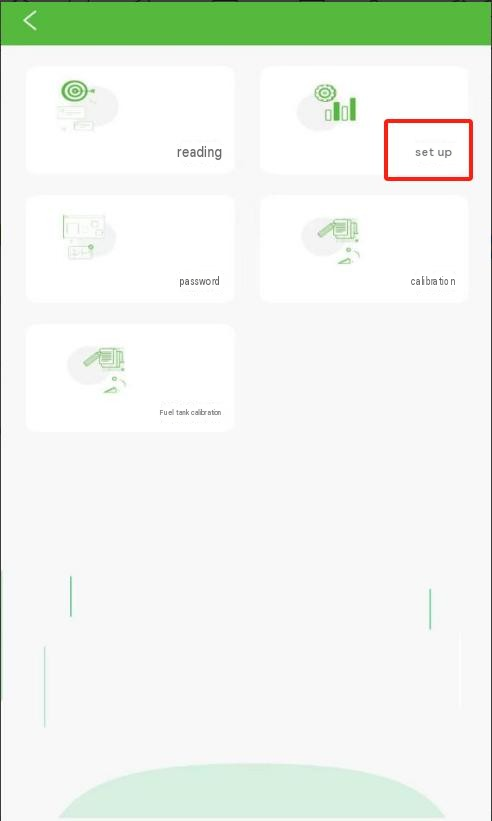
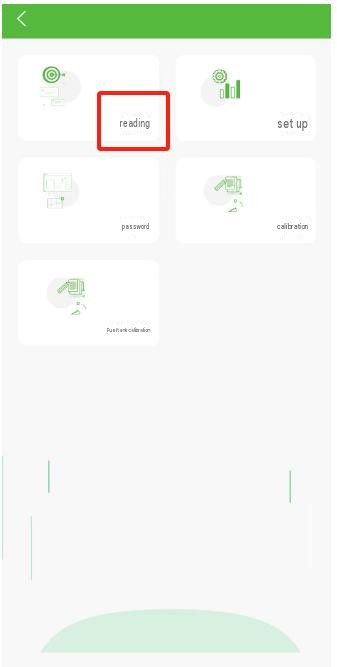
After connecting, you will see the sensor menu: reading, set up, password and calibration.
Sensor settings (leave as they are)
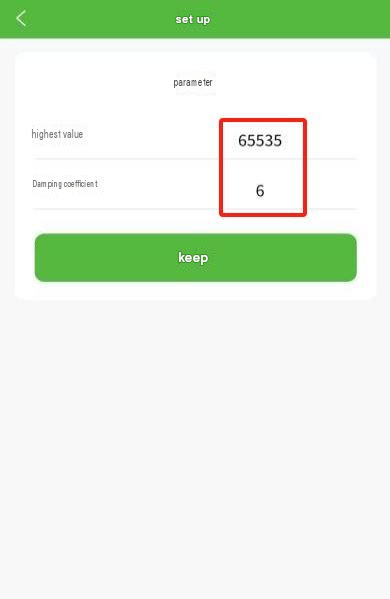
The set up menu shows two values. Both are set at the factory and should not be changed:
| Setting | Factory value | What it means |
|---|---|---|
| Highest value | 65535 | The sensor's top reading (a full tank). |
| Damping coefficient | 6 | Smooths out fuel moving around in the tank while driving. A higher number gives steadier readings but reacts more slowly. |
Damping levels and response time
| Damping level | 1 | 2 | 3 | 4 | 5 | 6 | 7 | 8 | 9 |
|---|---|---|---|---|---|---|---|---|---|
| Response time (seconds) | 22 | 33 | 44 | 69 | 120 | 180 | 240 | 300 | 360 |
Step 4 — Calibrate the sensor
Only needed if the probe was cut (see Step 1). Open the calibration menu. There are two ways to calibrate. Manual calibration is more accurate and is the one we recommend.
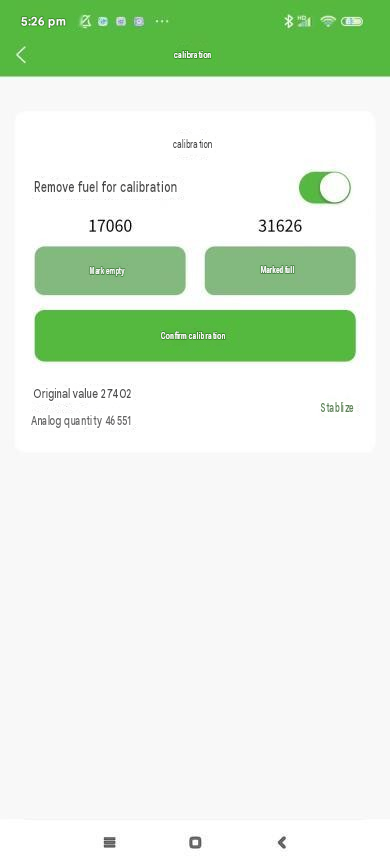
Method A — Manual calibration (recommended)
- Turn OFF the Remove fuel for calibration switch.
- Set the empty point: hold the sensor upright in the air (dry, not in fuel). Wait until the status on the right shows stable, then tap Mark empty. Wait for the success message.
- Set the full point: stand the sensor upright in a tube or container filled with the same fuel the vehicle uses. The fuel must cover the small vent hole at the top of the probe. Wait until the status shows stable, then tap Marked full.
When both points are saved, calibration is complete.
Method B — Automatic calibration
- Turn ON the Remove fuel for calibration switch.
- Hold the sensor upright in the air. Wait until the status shows stable.
- Tap Confirm calibration. Calibration is done when the app shows Calibration complete.
Step 5 — Install the sensor and check the reading
- Install the sensor in the fuel tank.
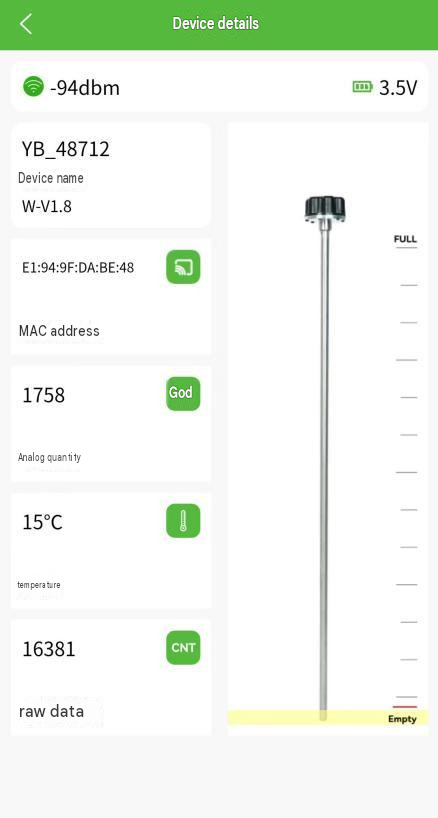
- In the app, open the reading menu.
- The page shows the sensor name, MAC address, analog quantity, temperature, raw data, and a fuel level picture on the right.
- Check that the level matches the fuel in the tank. When fuel is added or used, the reading should change. If it does, the sensor is working correctly.
Step 6 — Link the sensor to the H8
Send this command to the H8 so it knows which sensor to read:
BLELIST,<MAC>;0;1#
Replace <MAC> with your sensor's MAC address, written without the colons and in capital letters. Keep ;0;1# exactly as it is.
| MAC on the sensor label | Command to send |
|---|---|
CE:26:1F:75:B8:47 | BLELIST,CE261F75B847;0;1# |
F7:DA:B8:E9:2B:6E | BLELIST,F7DAB8E92B6E;0;1# |
You can send the command in either of these ways:
Option A — From Traqcare (the H8 must be online)
- Log in at track.traqcare.com and select the vehicle.
- Open Send GPRS Command from the vehicle's action menu.
- Choose a custom command, paste your
BLELISTcommand and send it. - The device's reply appears in the command history.
Option B — By SMS
Send the BLELIST command as a text message to the phone number of the SIM card inside the H8. The SIM must be able to receive SMS.
Step 7 — Turn on the fuel sensor in Traqcare
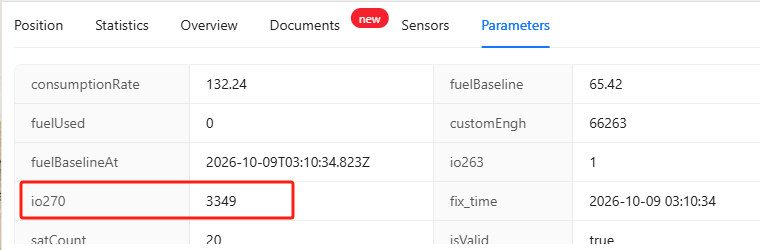
First, find which channel carries the fuel reading. It is usually io270, ADC1 or ADC2.
- On the Traqcare map, click your vehicle and open the Parameters tab.
- Look for
io270,ADC1orADC2. The one that shows a number (and changes when the fuel level changes) is your fuel channel. In the example below it is io270.
Then turn on the fuel sensor:
- Go to Settings → Devices, find your H8 and click Modify.
- Open the Device Sensors tab.
- Switch on FUEL.
- In Parameter, choose the channel you found above (
io270,ADC1orADC2). - Set Reading Type to Direct.
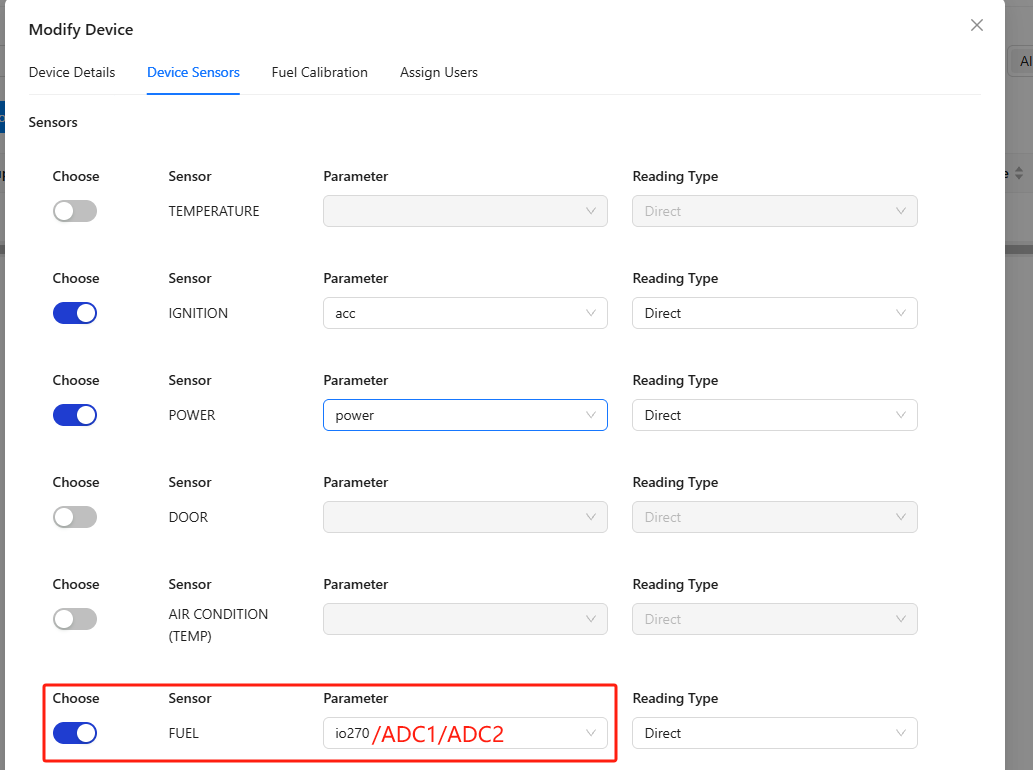
If the H8 is not on Traqcare yet, add it first under Settings → Devices → Add Device and select the JT808 protocol. See Adding a Device.
Step 8 — Fill in the fuel calibration form
The Fuel Calibration tab appears once the fuel sensor is switched on. Open it and enter:
| Field | Value |
|---|---|
| Sensor Output Unit | Voltage |
| Conversion Factor | 1.0 |
| Calibration Type | Automatic |
| Empty Tank Reading | 0 |
| Half Tank Reading | Leave empty |
| Full Tank Reading | 65535 |
| Tank Capacity | Your tank size in litres (for example 650) |
Click Submit.
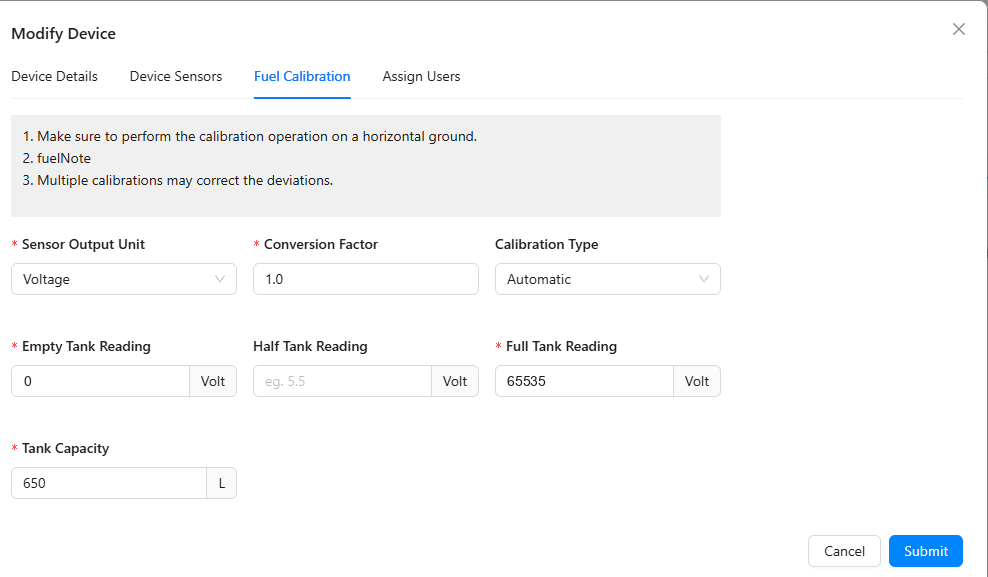
Make sure the Tank Capacity is correct. Traqcare uses it to turn the sensor reading into litres, so a wrong value gives wrong fuel figures.
Step 9 — Check the live fuel level
That's it. Open the vehicle on the Traqcare map: the fuel level now updates in real time. Fuel history is available in the fuel chart and fuel reports — see Fuel Management in the Traqcare platform docs.
Troubleshooting
| Problem | What to check |
|---|---|
| The app does not find the sensor | Bluetooth and Location are on, the app has Location permission, and the phone is close to the sensor. Make sure no other phone is connected to the sensor. |
| No fuel value in Traqcare | The H8 is online; the BLELIST command used the correct MAC (no colons, capital letters); in Parameters, the fuel channel shows a value; the same channel is selected in Device Sensors. |
| Fuel level is wrong | If the probe was cut, calibrate it again (Step 4). Check that Empty is 0, Full is 65535 and the tank capacity is correct (Step 8). |
| Reading jumps up and down | Normal while driving, as fuel moves in the tank. Leave the damping coefficient at the factory value 6. |
| Forgot the sensor password | Contact Skywonder support. |
Still stuck? Raise a ticket at track.traqcare.com/ticket with your H8 IMEI and the sensor's MAC address.